पेरोल प्रबंधन
PAYROLL ACCOUNTING
पेरोल प्रबंधन का अर्थ है-कर्मचारियों के वेतन, मजदूरी, बोनस, निवल वेतन और कटौतियों के वित्तीय रिकार्डों से संबंधित काम देखना।
मध्यम और बड़े आकार के कॉर्पोरेट समूहों में मानव संसाधन विभाग पेरोल का ध्यान रखता है। किन्तु व्यवसायों में ऐसा नहीं होता, क्योंकि उनके पास अलग से कोई मानव संसाधन विभाग नहीं होता। छोटी फर्मों में मालिक या कभी-कभी प्रमुख प्रबंधकर्ता पेरोल प्रणाली का काम संभालता है। विषय की जानकारी का अभाव, विधिक अनुपालन के बारे में जानकारी की कमी और प्रत्यक्ष अनुभव की कमी छोटी फर्मों के लिए पेरोल प्रबंधन के काम को कठिन बना सकती है।
कुछ संगठन पेरोल संबंधी कार्रवाई परंपरागत रूप से हाथ से करते हैं, जबकि कुछ उन्नत पेरोल कार्रवाई सॉफ्टवेयर इस्तेमाल करते हैं।
Payroll Software
Payroll system can be adapted in the form of automated software that performs every action needed by the payroll process. It helps in calculating the payable amounts and deductions very easily. It also helps in generating the pay slips in lesser time. Automated calculations result in no errors. Data is validated automatically by the software. (See the right panel for list of few firms providing free payroll and salary software).
Enabling Payroll in Tally.ERP (टैली में कैसे पेरोल आप्शन चालू करे )-
You can enable payroll in Tally.ERP 9 from the Cost/Profit Centers Management section under F1: Accounting Features in F11: Features
(पेरोल लागु करने के लिए आपको की बोर्ड पर F11और फिर F2 दबाना होगा )
To enable Payroll in Tally.ERP 9
1. Go to Gateway of Tally > F11: Features > F1: Accounting Features .
2. Tab down to Cost/Profit Centers Management section.
(Cost/Profit center Management सेक्शन में maintain Payroll को Yes करना है और उसी के निचे दिए हुए आप्शन Maintain more than payroll or cost category को भी YES करना है |)
Set the option Maintain payroll to Yes.
Set the option Maintain more than payroll or cost category to Yes ,
to allocate employee cost by creating separate employee categories.
Press Enter to accept and save, and return to the Gateway of Tally screen.
(एंटर बटन से सभी को सेव कर लेंगे )
The Gateway of Tally screen appears as shown below:
(अब gateway of Tallyविंडो पर Payroll Info. आप्शन आ जायेगा इसके अंदर जाकर हमे पेरोल इन्फो करनी है जो निम्न प्रकार है -)
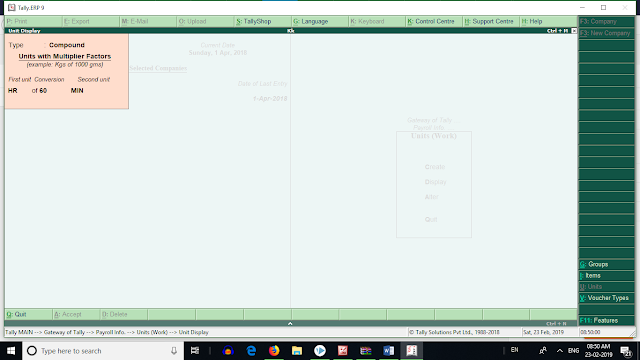
Create Unit Works -
1.) Type - Simple
Symbol- HR
2. Type : simple
Unit : Min
3. Type :Compound
HR of 60 Min
Creating a Single Employee Category
To create a single employee category
1. Go to Gateway of Tally > Payroll Info. > Employee Categories > Create (under Single Category ).
2. Specify the name of the category to be added, in the Name field.
3. Set the option Allocate Revenue Items to Yes to allocate revenue related transaction values for employees created under this category.
4. Set the option Allocate Non-Revenue Items option to Yes to allocate non-revenue related transaction values for employees created under this category.
Press Enter to save the employee category.
Creating Employee Groups (Payroll)
Creating Employee Groups helps to classify employees based on different parameters, such as their job function, department, location, cadre/designation, and so on. You can also define salary structures at the Employee Group level to apply a common salary structure for an entire department such as Marketing, R&D, Sales, and Accounts.
Creating a Single Employee Group
To create a single Employee Group
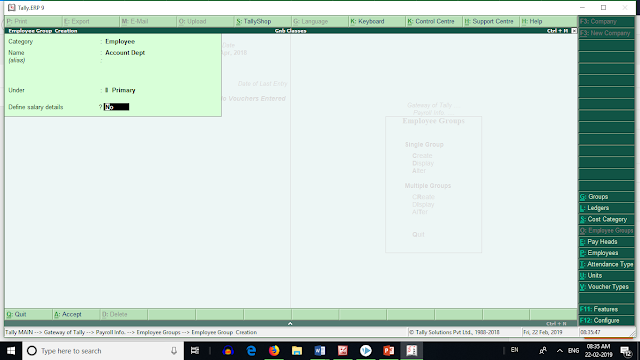
1. Go to Gateway of Tally > Payroll Info. > Employee Groups > Create (under Single Group ).
2. Select the Employee Category from the List of Categories .
3. Enter the Name of the Employee group.
4. Select the group under which the employee group is to be added.
5. Set the option Define Salary Details to no

Creating Single Employee
To create an Employee under the Employee group
1. Go to Gateway of Tally > Payroll Info. > Employees > Create (under Single Employee ).
Enter the Name of the employee. By default, the system displays the same value in the Display name in reports as .
Modify the Display name in reports as , if required.
Select the Employee Group in the field Under.
Enter the Date of joining.
Enter remarks, if any, in the Notes field.
Enter the employee General Information , employee's Bank Details for salary processing, Payment Details , Statutory Details , Passport & Visa Details and Contract Details.
Press Enter to save
Set the Define salary details? option to Yes , and press Enter to open Salary Details Creation screen.
In the Salary Details Creation screen, you can specify salary details of an employee. The Salary Details Creation screen appears as shown below:
Press Enter to view the Salary Details Creation screen.
Specify the salary details applicable to the employee group in this screen.
The Salary Details Creation screen appears as shown below:
Creating Attendance or Production Vouchers
You can use the attendance voucher to enter attendance, overtime, leave, or production details. You can enter separate vouchers every day or a single voucher for a given pay period, say a month, with aggregated values. One voucher can store data on all employees, and multiple attendance types.
Attendance Voucher – Manual Entry
To create attendance
1. Go to Gateway of Tally > Payroll Vouchers > Ctrl+F5: Attendance .
2. Click F2: Date to change the date.
3. Select the employee whose attendance you want to record from the List of Employees .
4. Select the Attendance/Production Type from the list.
5. Enter the Value .
6. Select End of List from the List of Employees.
Ctrl + F5
Ctrl +F4
Reports
Display-Payroll Reports


Comments
Post a Comment